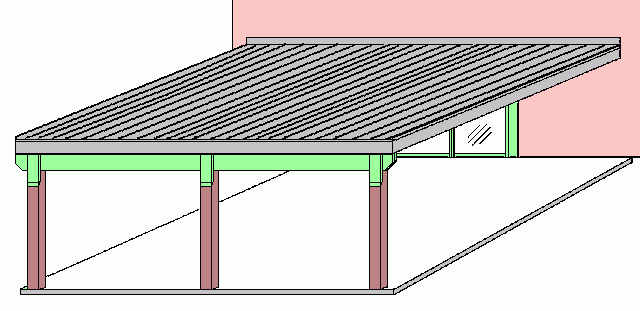
Patio Cover
These wood working plans include:
These wood working plans include:
The following drawings:
- Ledger Detail
- Scab Detail
- Joist Detail
- Fastening Metal Roof Panels
- End Wall Flashing
- Ceiling Plan
- Front Elevation
- Side Elevation
The List of Materials include materials for all the parts required to complete the project including: the ledger and fascia, joists, posts, beams, strapping, fascia board, sheet metal roofing, screws, caulking, flashing, joist hangers, lag screws and nails.
The Instructions include the following topics:
- The Ledger
- The Posts
- The Joists
- The Strapping
- The Fascia Board
- The Sheet Metal Roofing
- The Flashing
List of Materials
- 2 - 2x8x12' ledger and fascia
- 2 - 2x8x8' ledger and fascia
- 16 - 2x8x14' joists
- 6 - 2x6x8' posts
- 4 - 2x10x10' beams
- 7 - 1x4x12' strapping
- 7 - 1x4x8' strapping
- 1 - 1x10x10' fascia board
- 1 - 1x10x12' fascia board
- 2 - 1x10x14' fascia board
- 7 pcs. 13'-6" x 36" x 26 ga. sheet metal roofing
- 260 - 1" roofing screws
- 100 - self drilling lap screws
- 3 tubes butyl caulking if less than 3/12 slope
- 1 - 3x6x10' end wall flashing
- 1 - 3x6x12' end wall flashing
- 16 - long joist hangers for 2x8s
- 5 lbs. 1½" hanger nails
- 32 - 3/8x4" galvanized lag screws with flat washers
- 5 lbs. 2¼" common coated nails
- 5 lbs. 3" common coated nails
Instructions
The Ledger
You want the ledger installed as high as you can, but should be just below the drain or gutter of the existing roof, allowing for the 1x4 and metal roofing, which is about 1½". The ledger is attached to the house studs or box joist with 2 - 3/8x4" lag screws, (about 1½" from top and bottom) at every stud or 16" along the board. The slope of the roof should be at least 3" rise per foot of run. If the low end is at 80", the minimum the high end should be at is 9'-8". The roof joists are going to be attached every 16" as well as the lags, so start the first row of lags in 8" from the end, so they won't conflict with the joist hangers. Make sure the lag screws go into solid wood, either the existing box joist or wall studs. Drill the ledger out 3/8 and drill the backing out 3/16. Once the top of the ledger is determined, snap a chalk line or mark a level line along this height to use as a reference for where the ledger will go.
The left and right joist hanger is bent around the end of the ledger and nailed to it since there is no room on the face of the ledger as for the other ones. See the Ledger Detail.
The Posts
The posts are 2 - 2x6s laminated together with 3" common coated nails, cut at 80" long. The beams are 2 - 2x10s laminated together using the same size nails fastened at 16" apart, top and bottom. Cut the beams 10'-0", making the joint in the center on a post.
Place the posts into position and temporarily brace them up to each other and to a 2x4 stake in the lawn with the 1x4s. Make sure they are plumb both ways. Place the beams on top of posts, toe-nail them to the top of the posts and together. Cut 6 scabs as shown in the detail and nail them in position on each side of the joint at the post and beam. Nail the center scab to each side of the beams.
The Joists
Cut the 2x8 roof joists according to the detail, place any crown on the board at the top of the board. Layout the ledger and beam at 16" centers. Start at the left end, measure 15 1/4" and place a mark with an X on the right of the mark. Now move the tape to this mark and continue to mark and place an X in the same manner at every 16" mark on your tape, until you run off the 2x8.
Toe-nail the joist into the ledger with 4 - 3" galvanized nails and into the beam with 2 - 3" galvanized nails. Install the joist hangers around the remaining 2x8s on the ledger. Nail through every hole in the joist hanger with 1½" hanger nails. These are 1½" long and the same gauge as a 3" common nail. Nail the box joist on the end of the joists with 2 - 3" common nails into each joist.
The Strapping
Install the 1x4 strapping at 2' centers starting at the eaves, as shown on the ceiling plan. Make all joints on the center of the joists and stagger the joints. Nail the 1x4s onto each joist with 2 - 2¼" common nails.
The Fascia Board
Install the 1x10 fascia board over the box joist, flush with the top of the 1x4 on three exposed sides. Use 2 - 2¼" coated nails every 12".
The Sheet Metal Roofing
Order the metal roofing pre-cut to 13'-6 ". If you prefer to cut the lengths yourself, cut off the end under the flashing, at the top. The metal roofing comes in various widths and gauges. I estimated the coverage and screws on 36" exposure with ribs spaced at 9" apart. The metal roofing is best attached with screws with a rubber washer. Today we install metal roofing with a flat profile with ribs, unlike the round corrugated roofing of years past. The screws are applied to the flat part of the profile, one beside each rib, as shown in the drawing. The ends at the eave and ridge have a screw on each side of each rib. If the slope is not 3 in 12, caulking is required. Where the roofing overlaps the next sheet, apply some caulking along the rib before installing the next sheet. This type of roofing is recommended to have a minimum slope of 2 in 12 with sealant at the side overlaps. With a slope greater than 3 in 12, no caulking is required at the side laps.
The Flashing
Install the flashing along the top of the roof, over the metal roofing and up the end wall. Apply caulking under the flashing along the wall and screw into the stucco or sheeting, one row at the top of the flashing. Screw the flashing to the roofing through the ribs with the recommended short self drilling "stitch" or lap screws.
Here is a Ceiling Plan showing the position of the flashing in red and the fascia board:
Enjoy your patio cover.
Dave
(Ask Dave) (About Dave)Your source for building tips, woodworking & furniture plans, house plans and building advice directly from Dave...
Hi, I'm Dave Osborne. With over 50 years experience as a journeyman carpenter, foreman and contractor in heavy construction I enjoyed working with apprentices and sharing the tricks of the trade that others shared with me. Now I get emails from Members all over the world and we include many of my answers in our Free Monthly Newsletters. Some of my answers include drawings and instructions specific to a project, but may also answer your questions. I use correct construction terminology, so you can confidently inform your building supply dealers or contractors exactly what you need.
ASK DAVE!
The Benefits of Membership
Membership gives you full access to our hundreds of how-to articles, woodworking plans, converters, calculators and tables. Our Stair Calculator is one of the most popular on the internet. We have projects you can build for (and with) your kids, furniture for your wife, and sheds and gazebos. If you run into a problem or need advice your Membership includes unlimited email questions to me through our Ask Dave quick response button.
Join us!
Copyright © 1999-2024 DDFM Enterprises. All Rights Reserved. DDFM ENTERPRISES, DAVE'S SHOP TALK and the Dave Osborne logo are trademarks and service marks owned by DDFM Enterprises. All other trademarks on this site are the property of their respective owners. Site design by Design Strategies, Inc.