Wishing Well
These wood working plans include:
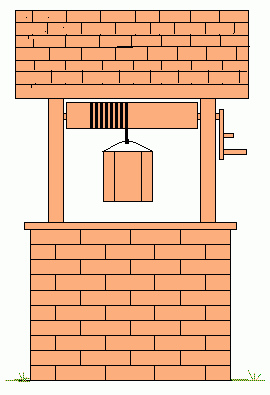
Detailed drawings of: Side and end Elevation showing the dimensions and angles; plan view of the wishing well ring; roof framing detail; drum and crank detail; detail of the bucket.
The plans have a List of Materials, showing a breakdown of materials needed for the wishing well.
The Instructions discuss how to cut the angles for the ring and octagonal wishing well bucket. The crank has a unique locking device to keep the bucket up. The bucket would look nice with a plant in it. The roof support and framing are also discussed.
List of Materials
- 144 feet of 2x4 for blocks and cap
- 13 feet of pressure treated 2x4 for the base row
- 2 - 4x4x 10' pressure treated
- 3 - 2x4x6' for rafters
- 2 - 2x4x6' for fascia
- 1 -2x4x6' for braces
- 1 - 2x6x6' for ridge board
- 1 - 1x6x8' for barge board
- 2 - 1x6x6' for fascia board
- 14 - 1x4x6' for strapping or 2 sheets 4x8x3/8" plywood or OSB for sheathing
- 30 square feet cedar shingles shakes or asphalt shingles
- 1 - 1x6x8' cedar for the bucket sides
- 1 - 1x12x1' for the bucket bottom
- 3 feet 1" dowel for drum and crank
- 1 round fence post, 3" to 4" in diameter for the drum or 1 - 4x4x4'
- 8' - 1/4" poly rope
- 2' - #9 wire for bale handle for bucket
- 2 pounds 3" galvanized finish or casing nails for rafters and fascia
- 3 pounds 2" galvanized finish or casing nails for blocks, fascia and barge boards
- 1 pound 2" common bright nails for strapping or sheathing
- 1 pound shingle or roofing nails
Instructions
As a pre-requisite to building this wishing well, I recommend that you read my articles on roof framing starting with: Roof 1: Rafter Tables on the Steel Square.
Let's start with the base of pressure treated 2x4s cut on the flat. The 2x4 blocks will be nailed to this. The 2x4 blocks are made to look like bricks so the 15 degree angle will be cut on the ends so the 3 1/2" side will be upright. The first row only will be cut to lay on the flat, the same length as the other rows at 12 3/4". Cut just the amount for the first row, 12 pieces, and try them out before cutting the remainder, the angle may need to be adjusted if not 15 degrees. There will be 120 of these blocks altogether. That is 10 rows high and 12 per row. Alternate each block's end over the center of the row under it.
This is the Plan View of the ring. Notice how the rings are the same diameter and length blocks, but are rotated 15 degrees to overlap the row below it. Lay the blocks on a plywood surface which has a 4' diameter circle scribed on it. Use this circle as a guide when laying out the blocks. After laying out 12 blocks for the first ring, scribe around the outside of the blocks to use the ring formed as a pattern for the ring of blocks above it. All rings will be identical except the base ring and the cap ring. Fasten the rings together by toe-nailing into the blocks into the ring below it. It may be useful to nail small nails on the lines to help keep the blocks in place while assembling them.
For the top row cut 12 - 2x4 blocks 13 3/8" on a 15 degree miter which will act as a cap. This will give about 1 1/2" overhang on the outside.
Place the ring level in position in your yard where it will stay. Dig holes for the 4x4 posts about 2' into the ground. Place the 4x4 into the hole and compact the bottom of the hole by lifting the 4x4 up and down. Backfill and compact the dirt all around the posts at about 6" increments. Brace the 4x4s both ways so they are plumb. In a wheelbarrow, mix a bag of concrete mix with water and pour it into the top 6" of each hole. The 4x4s support the wishing well roof and anchor the ring of blocks.
The roof is made of 32 1/2" long 2x4 rafters to form a 7/12 slope (30.25 degree plumb cut). The ridge board is supported on the 4x4s, as shown. Cut the top of the 4x4s off level with each other. Frame up the roof as shown on the ground, then lift it into place on the 4x4s. Nail the ridge board into the posts and install the braces from the posts to the rafters. Remember to fasten up the 1x6 fascia board on the 2x4 fascia and the 1x6 barge board on the end rafters. Attach the 1x4 strapping for cedar shingles or shakes or use 3/8" plywood or OSB for sheathing for asphalt shingles or rolled roofing.
The drum of the wishing well bucket winch can be made either from a 4x4 with the edges trimmed off on a 45 degree angle or purchase a round (peeler core) fence post and cut it to length. Cut the drum about 1/2" shorter than the distance between the posts, leaving 1/4" between the drum and the post. The axle of the drum is a 1" diameter wooden dowel available at building supply stores. For installation drill the drum center on each end to 1" in diameter and 3" deep. Drill the hole right through the post at 1 1/8" in diameter to allow for slippage. The crank can be made from a 2x4 shaped as shown with 1" diameter for all three holes. Insert screws at the points shown to prevent the dowels from turning. For the stop sand the dowel down slightly so it will be a snug but slip fit into the crank stop hole as well as the post. Round over the end slightly that goes into the post. This stop will move both ways to allow the crank handle to turn or remain stationery. The stop hole in the post is 2", so the stop dowel is 6". The left axle dowel should be 6 3/4". The crank handle dowel is 5 1/2".The crank to axle dowel on the right is 8 1/2". Place the drum in position and insert the dowels from outside of the posts into the center hole of the drum. Attach the crank onto the right side, using the longest dowel. If the dowel is loose in the part that should be tight, make up a 1" wide wedge (slight taper), split the dowel with a chisel and drive the wedge in to tighten the dowel.
Make the bucket out of 3/4" clear cedar or with tight knots. Cut 8 pieces 12" long and 4 15/16" wide with 22 1/2 degree angles ripped on each side. The bottom can be made out of 1x12. Fasten the sides together with 1 1/2" galvanized finish toe-nails using waterproof white glue. Place the wishing well bucket on the bottom and scribe the bottom out from the inside of the bucket. Cut to the line and insert the bottom inside the bucket, fasten with 1 1/2" galvanized finish nails through the face into the bottom. Fashion a bale handle out of #9 wire or the like. Insert a 10" plastic pot with your favorite flowers. Fasten 1/4" poly rope on the drum so that at the bucket's lowest point there is still a couple of turns of rope on the drum.
Enjoy your wishing well!!
Dave
(Ask Dave) (About Dave)Your source for building tips, woodworking & furniture plans, house plans and building advice directly from Dave...
Hi, I'm Dave Osborne. With over 50 years experience as a journeyman carpenter, foreman and contractor in heavy construction I enjoyed working with apprentices and sharing the tricks of the trade that others shared with me. Now I get emails from Members all over the world and we include many of my answers in our Free Monthly Newsletters. Some of my answers include drawings and instructions specific to a project, but may also answer your questions. I use correct construction terminology, so you can confidently inform your building supply dealers or contractors exactly what you need.
ASK DAVE!
The Benefits of Membership
Membership gives you full access to our hundreds of how-to articles, woodworking plans, converters, calculators and tables. Our Stair Calculator is one of the most popular on the internet. We have projects you can build for (and with) your kids, furniture for your wife, and sheds and gazebos. If you run into a problem or need advice your Membership includes unlimited email questions to me through our Ask Dave quick response button.
Join us!
Copyright © 1999-2026 DDFM Enterprises. All Rights Reserved. DDFM ENTERPRISES, DAVE'S SHOP TALK and the Dave Osborne logo are trademarks and service marks owned by DDFM Enterprises. All other trademarks on this site are the property of their respective owners. Site design by Design Strategies, Inc.