How to Build a House 5: How to Install Vinyl Siding
How to Build a House: Tar Paper First
After the roofing is installed on your house we try to get to the exterior finishing as soon as possible to protect our house from the elements. According to the building code, no matter what exterior finish we put on our house, we need tar paper on top of the sheathing. Tar paper is rated for the number of minutes it keeps moisture from passing through it. The common ratings are 30 and 60 minutes.
Start on the lowest wall of the house. Usually, the top of the concrete foundation wall of a house is level. Determine the level line on the bottom of the wall by overlapping the concrete foundation, with the wall, about ¼" to ½" or forming a drip off the sheathing, the same amount. Measure up to the eaves of the house in a few places to make sure that the bottom of the concrete wall is parallel to the soffit line. Measure up from this mark the width of the tar paper roll and snap a chalk line. Fasten the tar paper to the wall of the house, with staples, with its top on this line, starting at the corner. Overlap the corner at least 4". A hammer stapler works well, with fastening tar paper on. Most tar paper has parallel lines already marked on it. The tar paper should be overlapped a minimum of 4" along its bottom and around the corner. Notice how the top row of tar paper overlaps the one under it so that any water running down the wall of the house will run over each sheet of tar paper right to the bottom. Before stapling on the second sheet of tar paper and covering up the sheathing, it is a good idea to mark the center of the studs on the tar paper so you know exactly where to nail the siding. You can tell where the stud is by the nails in the sheathing. A row of nails every 16" is good. Mark the studs of the house on the top of each sheet like this. A lumber crayon works well. Make sure to mark down from the top about 6" so the sheet above it doesn't cover up your marks. You will find this handy when installing the vinyl siding, the J-molding and the trim. Tar paper the sheathing, following it around the house.
How to Build a House: Installing Vinyl Siding
With vinyl siding you will use a lot of J-molding. We use it around all the doors and windows of the house, inside corners, a bottom row of vinyl siding that has the bottom cut off, vertical risers in the foundation wall, as well as under the soffit and along the eaves of the gable end wall.
An alternate way of installing vinyl siding is to use cedar 1x4 on the corners and around the windows and doors of the house. This is the way I did my house. It trims the house very nicely. If going this way install the corners, door and window trim after the tar paper is installed. Paint the cedar trim before installing the vinylsiding. My exterior back door came with a brick molding attached, so I chose not to add a 1x4 around it. My sliding patio doors and front entrance door of my house did not come with any trim, so I did install 1x4 around them. Refer to the pictures of the trim on my house.
Notice this door has a drip cap over the top of the trim, as well as the top of the door. This door is on the gable end of the house and is not protected by a roof overhang. The code states that flashing or drip cap must be used if the vertical distance from the bottom of the eave to the top of the trim of the door or window of a house is more than one-quarter of the horizontal overhang of the eave, that is, for example, more than 6" below a 2' overhang.
![]()
This entrance door of a house doesn't need a drip cap since the door is under a wide overhang.
If going with the conventional vinyl siding, start with the corners. Measure the corner height less ¼" for expansion, from the bottom line to the soffits. Keep the bottom on the line and allow the ¼" at the top. To keep the corner in place, fasten the nail into the top of the highest slot, so it causes the corner to hang at the correct height. Fasten the remaining nails in the center of the slots about 8" apart. Fasten the nails loose, so the heads are not driven in tight against the vinyl siding. Use galvanized roofing nails. We have to be very aware of the expansion and contraction principles of vinyl siding. If applied in the summer, allow ¼" for expansion, in the winter allow 3/8". Finish the outside or inside corner on the opposite end of the wall in the same manner.
An alternate to the factory inside corner is two J-moldings nailed up beside each other, one on each wall, as shown in this picture.
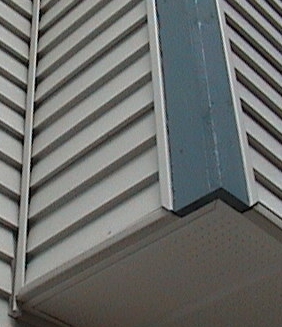
Notice that I ripped 3/4" off one outside corner so that the installed corner of vinyl siding would show the same width on each side.
Installing the J-mold around a window is a bit of a trick. We have to be aware of the J-mold in the rain and wanting to have it shed water away from the house. First start with the bottom trim, cutting it ¾" longer on each side. Actually, each piece of J-mold, around a window, is cut ¾" longer on each end to allow us to miter the corners. Cut the bottom end as shown in the picture, trim off the miter.

Cut the side as shown in the picture, notice the flap is cut but left on. This flap tucks in under the bottom trim and is held in place by the vinyl siding. This allows the rain water to run down the side and out the bottom.
This picture shows the completed fit at the bottom side.
The side at the top is cut as shown here. The flap is removed, leaving a notch for the top flap to insert.
Here the top is mitered and the flap is left on to tuck down the side to shed water.
Here is the completed top to side corner.
Follow these directions on installing trim around the door and other pieces of cedar, such as the meter base.
Okay, we have the inside and outside corners of the vinyl siding on and the J-molding around the windows, doors and other block outs. We install the starter strip next, if the first row of vinyl siding has the bottom intact. The starter is simply a piece of molding the same as the top of the vinyl siding with a strip on top to nail it to the sheathing. The vinyl siding is then attached to the starter by lifting it into position to snap into place, just like the vinyl siding snaps into place with each other. A J-mold is installed in place of the starter strip if the first row's bottom is trimmed off. Always start at the lowest wall of the house with a full width of vinyl siding. When coming up the wall at a vertical rise in the foundation wall, the vinyl siding width is cut to overlap the concrete by 1/4" to 1/2".
Now let's start vinyl siding. Cut the vinyl siding length either ¼" or 3/8" less depending on the temperature. Lay the vinyl siding length into position, just below the starter strip. Lift the bottom of the vinyl siding into the starter strip and lift up until it snaps into place. The vinyl siding should stay there by itself. Nail into the center of the slots, on top of the vinyl siding length, over a stud, as marked on the tar paper. Here again, don't hammer the nails home. Leave the heads against the slots, loose with the vinyl siding. You should be able to slide the vinyl siding back and forth the width of the slots. Continue installing vinyl siding, like this, overlapping lengths by 3/4" to 1". On long side walls, I prefer to start at the back side of the wall rather than the front. This way the overlaps are hidden from the front view. Stagger those joints in a random pattern. The vinyl siding laps should be at the same level all around the house.
Another thing to learn about is the finishing strip. This strip is applied to the wall just before the bottom of a window or a soffit. Its purpose is to hold the top of the vinyl siding after the nailing strip is removed. A tool is provided to pinch the top of the vinyl siding to form dimples which install inside of the fold of the finish trim which helps hold it in place. When I installed my vinyl siding I used a common head 3 1/4" nail and dimpled the vinyl siding with it, by tapping it, with a hammer, just heavy enough on the edge of the head to create a dimple on the face of the vinyl siding.
With a little initiative, you can mix and match vinyl siding, brick and cedar to make your exterior finish stand out from the other houses on your street.
Dave
(Ask Dave) (About Dave)Your source for building tips, woodworking & furniture plans, house plans and building advice directly from Dave...
Hi, I'm Dave Osborne. With over 50 years experience as a journeyman carpenter, foreman and contractor in heavy construction I enjoyed working with apprentices and sharing the tricks of the trade that others shared with me. Now I get emails from Members all over the world and we include many of my answers in our Free Monthly Newsletters. Some of my answers include drawings and instructions specific to a project, but may also answer your questions. I use correct construction terminology, so you can confidently inform your building supply dealers or contractors exactly what you need.
ASK DAVE!
The Benefits of Membership
Membership gives you full access to our hundreds of how-to articles, woodworking plans, converters, calculators and tables. Our Stair Calculator is one of the most popular on the internet. We have projects you can build for (and with) your kids, furniture for your wife, and sheds and gazebos. If you run into a problem or need advice your Membership includes unlimited email questions to me through our Ask Dave quick response button.
Join us!
Copyright © 1999-2026 DDFM Enterprises. All Rights Reserved. DDFM ENTERPRISES, DAVE'S SHOP TALK and the Dave Osborne logo are trademarks and service marks owned by DDFM Enterprises. All other trademarks on this site are the property of their respective owners. Site design by Design Strategies, Inc.